When performing a Mule 3 to Mule 4 migration, we want to ensure that the new Mule 4 APIs return the same results as the previous Mule 3 APIs. We also want the performance to improve or, at least, remain the same. So, there is a significant need for tests and documentation after the migration. Also, there is a lot of room for test automation because manually testing hundreds of flows is inefficient and error-prone.
In this article, I will look at how you can apply Test Driven Development (TDD) principles to a Mule 3 to Mule 4 migration project and the benefits of using this approach.
The need for automation
Imagine an organisation with 10 APIs that need to be migrated from Mule 3 to Mule 4. Each API has an average of 10 endpoints, each with an average of 5 possible scenarios, for example, data combinations that produce different flows. In this case, the test team would need to run five hundred requests on Mule 3 and five hundred requests on Mule 4, grab the results, compare them individually, and document the output. They would also need to track response times to evaluate the performance.
Since each manual test takes an average of 10 minutes, completing the entire migration test would take 166 hours! Moreover, relying on manual tests would never give you enough confidence that all results are 100% accurate, and it would require such a huge task force that it would probably only be done once or twice in a lifetime. So, it makes a lot of sense to automate testing and document generation during a Mule 3 to Mule 4 migration.
Test-driven development principles
Typically, testing only starts after completing the migration. However, it must remain an essential task that should never be overlooked. If we know we will do this effort anyway, we should consider the benefits of creating the automated tests before implementing the migration. We can achieve this using a Test First approach, one of the TDD principles.
Many TDD principles seem highly relevant for this kind of project:
Red-Green-Refactor Cycle: This is the process of writing a test (Red), writing the minimal code required to pass the test (Green), and then refactoring the code (Refactor).
Write the Simplest Code to Pass the Test: Developers aim to write the simplest code that fulfils the requirements of the test. This means avoiding unnecessary complexity.
Run the Entire Test Suite: After writing code, the developer runs the entire suite of tests to ensure that the new code doesn’t break any existing functionality.
Write Clear and Specific Tests: Tests should be clear, specific, and focused on testing one piece of functionality. They should be easy to understand and maintain.
Tests Should Be Fast: Developers should run tests quickly and frequently during development.
Tests Are Documentation: Tests serve as living documentation for the codebase. They provide examples of using code and help to prevent regressions.
The first TDD principle, the Red-Green-Refactor Cycle, tells us to create the tests before the code. In a Mule 3 to Mule 4 migration project, this means developing the test flows before implementing the Mule 4 APIs. You will need to build a Mule application that tests all the existing Mule 3 endpoints and compares them with their yet-to-be-implemented Mule 4 counterparts. These Mule 4 APIs can be created at this stage as placeholder endpoints without actual implementation or even using the MMA tool. This way, the first time the test runs, it would get 0% passed. So you will know that your migration is 0% completed, and as developers progress in the migration work, you will easily generate a status at any time and know how far you are from reaching the end of the migration.
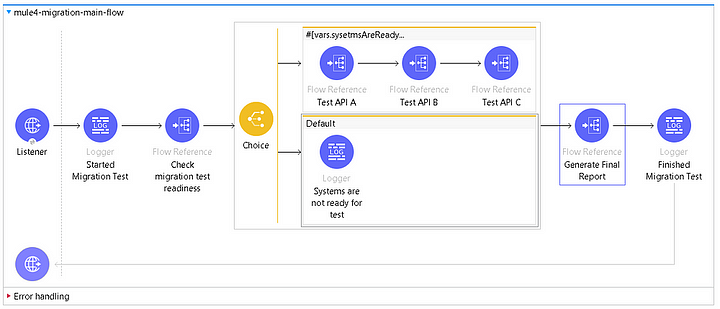
Creating a migration test application
To accomplish this, we can create a simple Mule application that orchestrates the automated tests for all APIs, endpoints and scenarios and generates a migration status report at the end.
We can start by running a simple readiness check to ensure that all dependencies, such as databases, message brokers, downstream APIs, etc., are ready and accessible for both Mule 3 and Mule 4. After preparing the systems, the application starts testing each API.
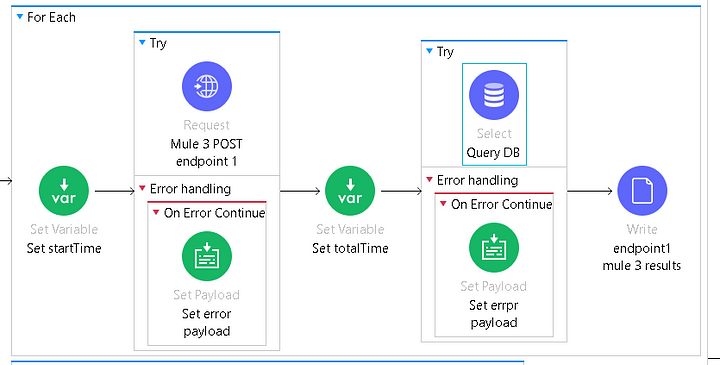
For each endpoint, the application can load test data from a CSV file and send, in parallel, the same request to the existing Mule 3 endpoint and the new Mule 4 endpoint, save each result in individual files and finally consolidate both results.

There will be extra work for POST, PATCH, and DELETE operations to automate the tests fully. This can be accomplished, for example, by querying the backend after the request took place and checking if the operation produced the desired result, such as inserting, updating or deleting a record.
Generating migration reports
For each environment, Mule 3 and Mule 4, the application generates CSV reports with all output data: Status code, response and elapsed time for each API/endpoint/scenario and generates individual reports.
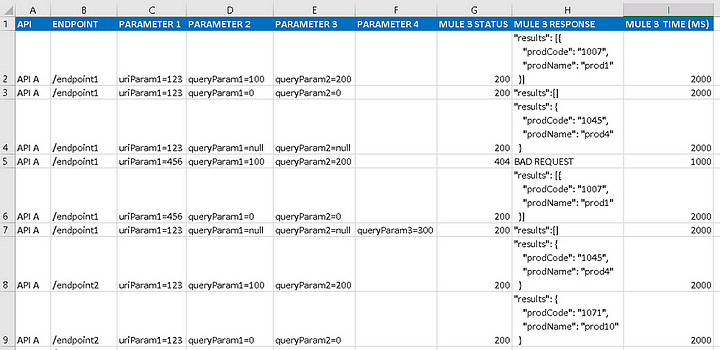
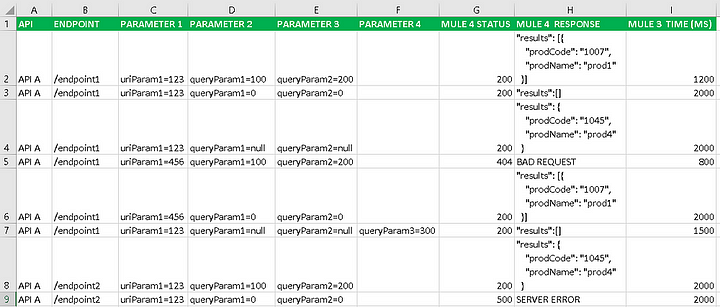
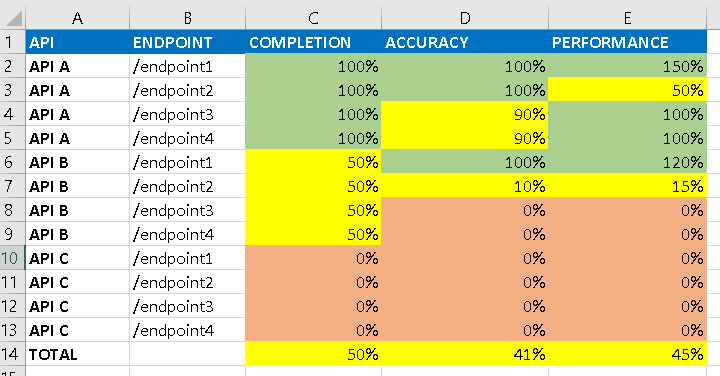
At the end of the process, the application compares each result and generates a high-level status report, giving you a detailed and accurate view of how much work is still needed to complete the migration. It will also show you how accurate the new endpoints are in getting the same results as the old ones. Finally, it will provide Mule 4 performance results compared to Mule 3 APIs.
Benefits of test-driven migration
With this approach, organisations have a reliable, efficient and easy way to:
- Test if the new Mule 4 APIs get the same results as the previous Mule 3 APIs.
- Test if the new Mule 4 APIs’ performance has improved, remained the same or deteriorated after the migration.
- Know exactly how far the migration is from completion by referring to the migration status report.
- Regression test. After each specific endpoint migration, the developer can run the entire suite of tests to ensure that the new code didn’t break the endpoints previously migrated.
- Provide Documentation. Tests serve as living documentation for the migration. They provide a report of the migration status.
- Support the post-migration stage by checking if new bugs or defects were caused by the migration or not. They also provide evidence of Mule 3 results if users question the Mule 4 results.
Test-driven migration major challenges
Some challenges might arise during this Test-Driven Migration approach. However, most of them are problems that would need to be dealt with at some point during the migration, regardless of the method used.
- Set up, sync and isolate SIT (System Integration Testing) backend environments. To validate these endpoints, Mule 3 and Mule 4 environments need perfectly synced and isolated backend systems.
- Non-idempotent operations such as POST, PATCH and DELETE methods require more attention and effort to develop your test flows.
- Asynchronous flows with heavy use of queues and/or topics can also add complexity to design your test flows.
- Convince developers to follow the ‘write a test before coding’ approach. Developers tend to do testing at the end of the cycle and might need a little push to break this habit.
- Sometimes, the test planning starts when the migration has already begun. Nevertheless, you should still get most of the benefits of creating the automated tests for a migration project already in progress.