Whenever AI and automation are efficiently combined, the results are outstanding. This is what some people would call intelligent automation, but we could just as well call it magic!

This is exactly the feeling we get with MuleSoft IDP (Intelligent Document Processing) and MuleSoft RPA (Robotic Process Automation). Together, they make a powerful automation platform with endless possibilities.
With the AI-powered MuleSoft IDP we can easily extract data from documents such as invoices and purchase orders in PDF – as well as different image formats – using pre-trained AI models. It is fully integrated with Salesforce Einstein which gives us the option to write custom AI prompts as well. It also offers a user-friendly interface to add a human in the loop to review documents if it finds data below pre-configured confidence thresholds, strengthening the process and ensuring the accuracy of document workflows.
Most of the time, a REST API would be enough to send the data from IDP to the destination target after it gets extracted. However, there are certain scenarios where APIs would not reach and, therefore, we would still rely on manual processes… But not if we use MuleSoft RPA! RPA allows us to automate anything a human would do at a much faster pace and less error-prone.
With these features, we can intelligently automate repetitive, time-consuming, and boring processes and streamline business with an efficiency never seen before, leaving just high-level decision-making and interesting work for humans.
In this article, I will provide a step-by-step guide to laying the foundation and creating an intelligent automation demo with MuleSoft IDP and RPA.
The use case
We will create an AI-powered automation demo with the following requirements:

The RPA Bot will:
- Iterate over a set of invoice documents with different layouts.
- Extract information from the document using a MuleSoft IDP document action.
- Write the results in an Excel document.
- Reprocess documents reviewed by a business user in MuleSoft IDP.
Setting up the environment
Pre-requisites
In order to create and run this demo, here is what you’ll need:
- Anypoint Platform Automation Package
- RPA Builder
- RPA Bot
The Automation Package gives you access to RPA, Composer and IDP. You should be able to see a section called Automation on the Anypoint Platform’s homepage.

IDP and RPA permission
If you are an org admin, you should be able to do this yourself. Otherwise, you’ll need to request this from someone with this permission. In Access Management make sure you have these permissions under Document Actions and RPA.

Connected App
Create an IDP-connected app. To connect MuleSoft RPA to IDP, we need to create a connected app in the Anypoint Platform. Under Access Management, you will see a Connected Apps tab. There you can click on the Create app button and choose these options:
IDP
Type: App acts on its own behalf (client credentials)
Scopes: Execute Published Actions
This will generate the client ID and client secret credentials, which will allow you to connect RPA to the IDP document action published in Exchange. For now, just keep these credentials somewhere handy.
Creating a document action
- Gather a few invoice documents
Look for three or four invoices to create this demo. They can have different layouts. The beauty of IDP is that it will most likely find all relevant information regardless of the structure of the document. - Create a new document action
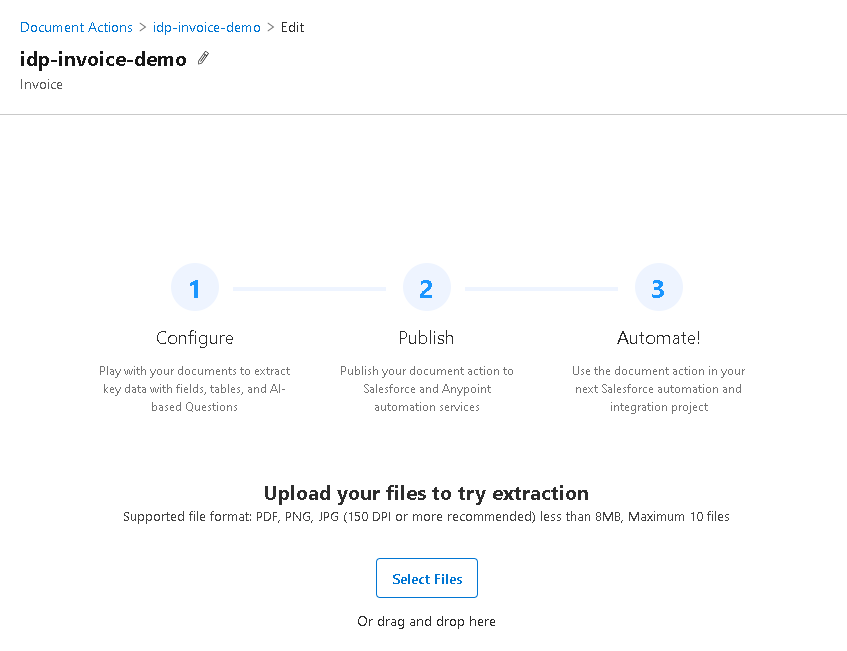
On the MuleSoft IDP home page, create in the ‘+ Create new’ button. Select the Invoice type. Just type a title and description and click the Create button.

- Upload a sample file
Click on the ‘Select Files’ button and select any of the invoices you gathered in step 1.
- Select Fields
Click on ‘Run’ to test your document extraction. This will make it easier to select the fields once they are populated. When you click on a field, you can configure it. Set if it is required and the confidence threshold. In order to keep things simple, we will select only the 4 fields below by omitting all the other fields by clicking on the eye icon. Leave the confidence with a default value of 80% for all of them.
a. total
b. dueDate
c. parties.buyer.name
d. invoiceNumber

- Check the Tables tab
Besides the schema of standard invoice fields, IDP also extracts tabular data, such as line items on an invoice or purchase orders, as an array. For simplicity, we will not add tabular data for this demo, so you can omit that by clicking the eye icon.

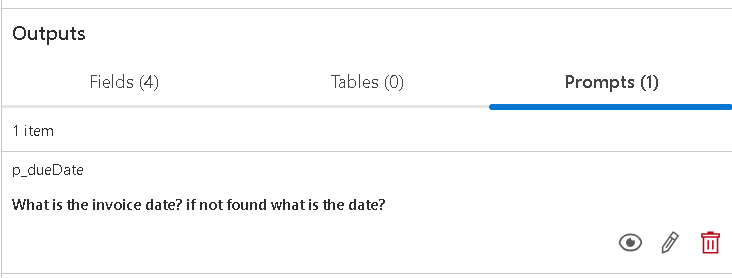
- Create a prompt field
Click on the Prompts tab and click on the ‘Add New’ button. Create a prompt
Name:
p_dueDate
Question:
What is the invoice date? If not found, what is the date?
Most invoices have a field called due date; however, there are some exceptions where the field is called invoice date or just date. In RPA, we will create a fall-back mechanism where, if the due date is not found, we will use the custom p_dueDate.
- Add a reviewer
When in the production phase, you would add a business user as a reviewer. For development purposes, you should add yourself so you can test the review process. Click on the Add button in the Reviewers section, search for your account, and click ‘Save’.

- Publish Document Action
Click on Save and then the Publish button.

- Check the published document action in Exchange
Take some time to analyse the API you have just created. The Document Action API will have two endpoints:
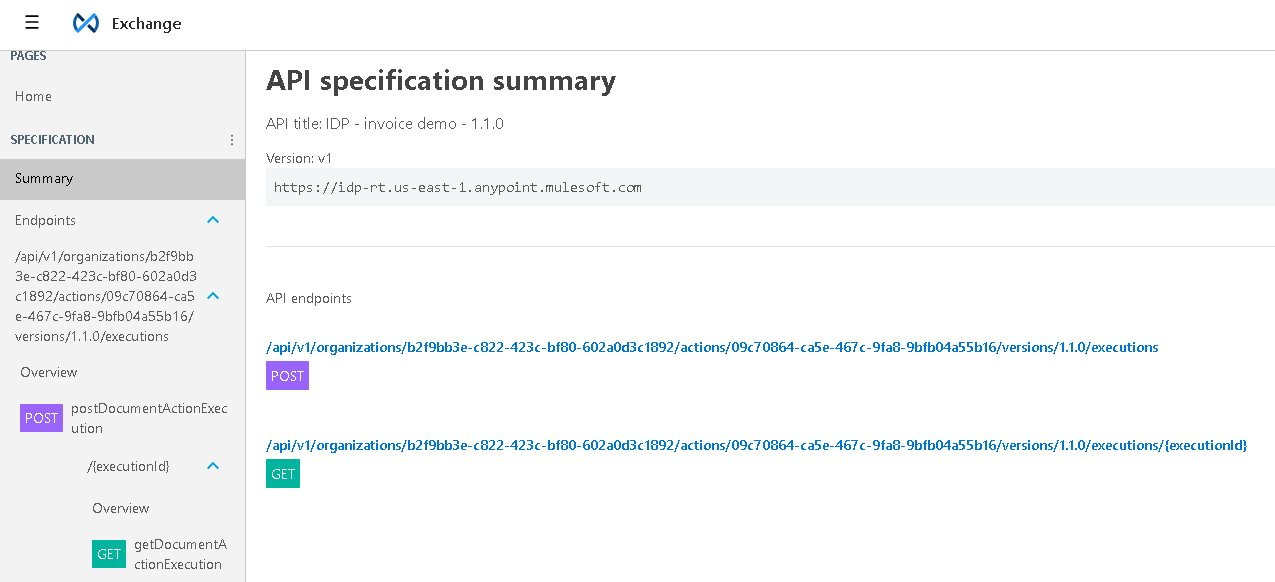
postDocumentActionExecution. Post invoices to the MuleSoft IDP. It will try to extract the fields configured in the document action and return a unique execution-id.
getDocumentActionExecution. Get the current status for a given execution-id. This status can be:
- ACKNOWLEDGED: The document action execution request was received.
- IN_PROGRESS: The execution started.
- RESULTS_PENDING: The execution is finished, and IDP is processing the results.
- MANUAL_VALIDATION_REQUIRED: The execution is finished, but the results need manual validation.
- FAILED: The execution request finished unsuccessfully.
- PARTIAL_SUCCESS: The execution request finished, but some sub-tasks failed.
- SUCCEEDED: The execution request finished successfully.
When the status is SUCCEEDED, it will return the structured data from the document. This is a JSON object that consists of the execution ID, document name and all the fields, table fields and prompt fields and their respective values and confidence levels. IDP supports documents with multiple pages so it will separate the fields in a ‘pages’ array.

Creating an automated process in MuleSoft RPA
- Create RPA automation
In RPA Manager, create a new process. In the Design phase, create the two tasks below and publish them to advance to the Build phase.

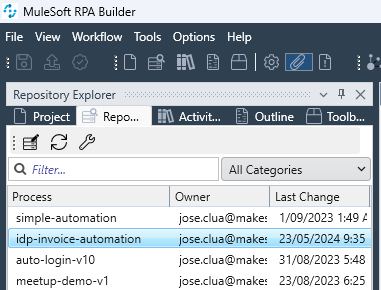
- Open process in RPA Builder
Once the process is in the Build Phase you should be able to open it from RPA Builder in your Repository tab.
- Prepare files
Create a folder called IDP DEMO and inside this folder, create another folder called Invoices and copy all your invoice documents in it. In the IDP DEMO folder, create an Excel file with the following columns:
- Item
- File name
- Execution Id
- Result
- Invoice Number
- Due date
- Name
- Total

- Add Activity Parameters
Activity parameters can be added by clicking on the upper-right menu:

Add all the variables that will be used throughout the automation. Values can be initial or default values. Some variables will be added during the execution.
| Name | Type | Value (default) |
| Idp | Connected app credentials | client_id, client_secret from previous section |
| directoryPath | Alphanumeric | C:\Users\<username>\Documents\IDP DEMO |
| idp_executionId | Alphanumeric | |
| numberOfFiles | Integer | 4 |
| fileName | Alphanumeric | Invoices.xslx |
| sheetName | Alphanumeric | Sheet1 |
| rowNumber | Integer | |
| dueDate | Alphanumeric | |
| customerName | Alphanumeric | |
| total | Alphanumeric | |
| invoiceNumber | Alphanumeric |

- Implement the Submit documents to the IDP task
In this task, we will iterate over the IDP DEMO/invoices folder and submit each file to our document action in MuleSoft IDP.
First, we must add all the variables needed for this task. Click on the task level activity parameters in the Workflow Initialization section and select the following parameters:

Now, we need to drag and drop the components below and configure them. Let’s go one by one with details:

- Go to the desktop. This is an optional keystroke function: press ‘Windows Key + ‘D’ simultaneously to show the Windows desktop screen.
- Set invoices Path. This is a Combine Strings function to concatenate the directoryPath variable to ‘/Invoices’.
- Iterate over Files. This is an iterate over files function set to iterate over the invoice path.
- Submit the Document to MuleSoft IDP. This function consumes the document action we created in the previous section. We need to set these parameters:
- Action: idp-invoice-demo
- Directory path: Activity Parameters.directoryPath
- File name: Iterate over Files.iterateFileName
- Connected App Credentials: Activity Parameters.idp

- Set executionId. This is a Set Variable function to save the executionId in the Activity Parameters.idp_executionId variable.
- Set numberOfFiles. Set Activity Parameters.numberOfFiles to Iterate over Files.iteration.
- Math operations / Set rowNumber. Functions to set Activity Parameters.rowNumber to Iterate over Files.iteration + 1. The row number in Excel needs to start with 2 because of the header in row 1.
- Message Box. Display Activity Parameters.numberOfFiles message box. Message boxes are optional, they help the developer to know what is happening during the execution.
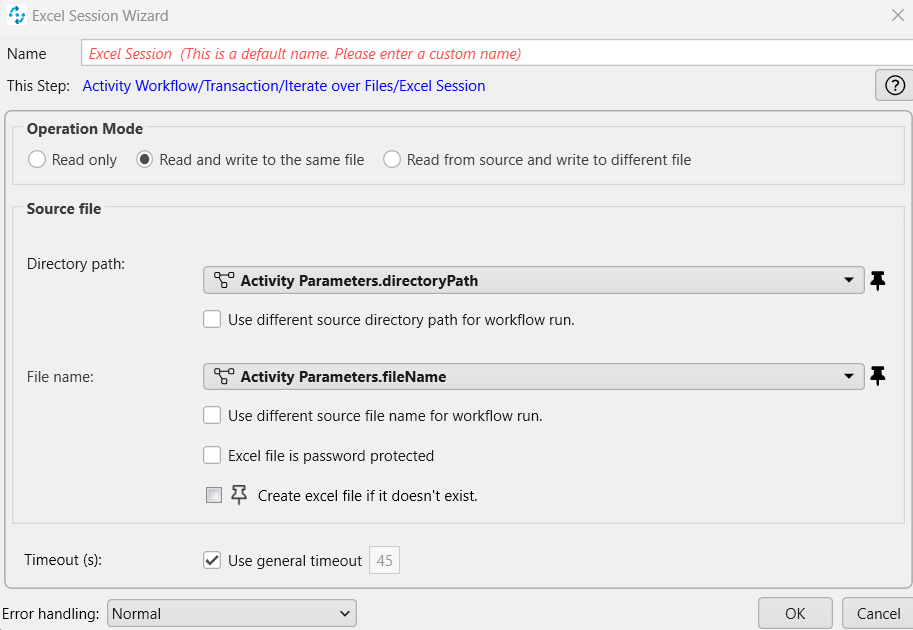
- Excel Session. Function to create an Excel session bound to the invoices Excel file. Set this configuration:
- Operation Mode: Read and write to the same file
- Directory path: Activity Parameters.directoryPath
- File name: Activity Parameters.fileName
- Write Item #. Write to Excel file function to write Item number. Set:
- Sheet name: Activity Parameters.sheetName
- Excel mode: Cell
- Column: A
- Row: Activity Parameters.rowNumber.
- Text to write: Iterate over Files.iteration

- Write File Name. Write to Excel file function to write file name. Set:
- Sheet name: Activity Parameters.sheetName
- Excel mode: Cell
- Column: B
- Row: Activity Parameters.rowNumber
- Text to write: Iterate over Files.iterateFileName
- Write ExecutionId. Write to Excel file function to write execution id. Set:
- Sheet name: Activity Parameters.sheetName
- Excel mode: Cell
- Column: C
- Row: Activity Parameters.rowNumber
- Text to write: Submit Document to MuleSoft IDP.ExecutionId
- Write Result. Write to Excel file function to write execution result. Set:
- Sheet name: Activity Parameters.sheetName
- Excel mode: Cell
- Column: D
- Row: Activity Parameters.rowNumber
- Text to write: Submit Document to MuleSoft IDP.Success
- Implement the Retrieve results from the IDP task
Like we did for the previous task, we must add all the variables needed in this task. Click on the task level activity Parameters in the Workflow Initialization section and select the following parameters:

Here is a possible solution to implement this task:
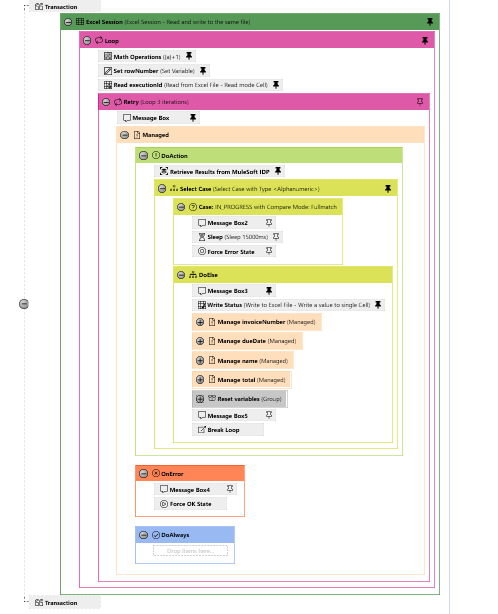
- Excel Session. Function to create an Excel session bound to the invoices Excel file. Set this configuration:
- Operation Mode: Read and write to the same file
- Directory path: Activity Parameters.directoryPath
- File name: Activity Parameters.fileName
- Loop. Function to iterate from number 1 to Action Parameters.numberOfFiles
- Read executionId. Read from Excel file function to read executionId. Set:
- Sheet name: Activity Parameters.sheetName
- Excel mode: Cell
- Column: C
- Row: Activity Parameters.rowNumber
- Retry. Loop function to iterate from 1 to 3 to implement a retry mechanism. Because the method Retrieve results from MuleSoft IDP can return status IN_PROGRESS, we need to create a logic to wait for a few seconds and then retry in case we get this status (similar to the Until Successful scope in MuleSoft APIs).
- Managed. This function adds the DoAction, OnError and DoAlways blocks. This is similar to a try, catch, finally in programming, and we will use this to create the retry logic.
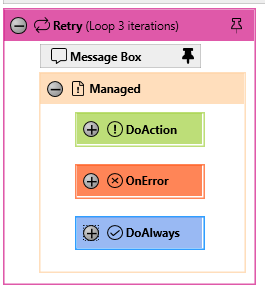
- DoAction. In this block, we will try to read the results from IDP.

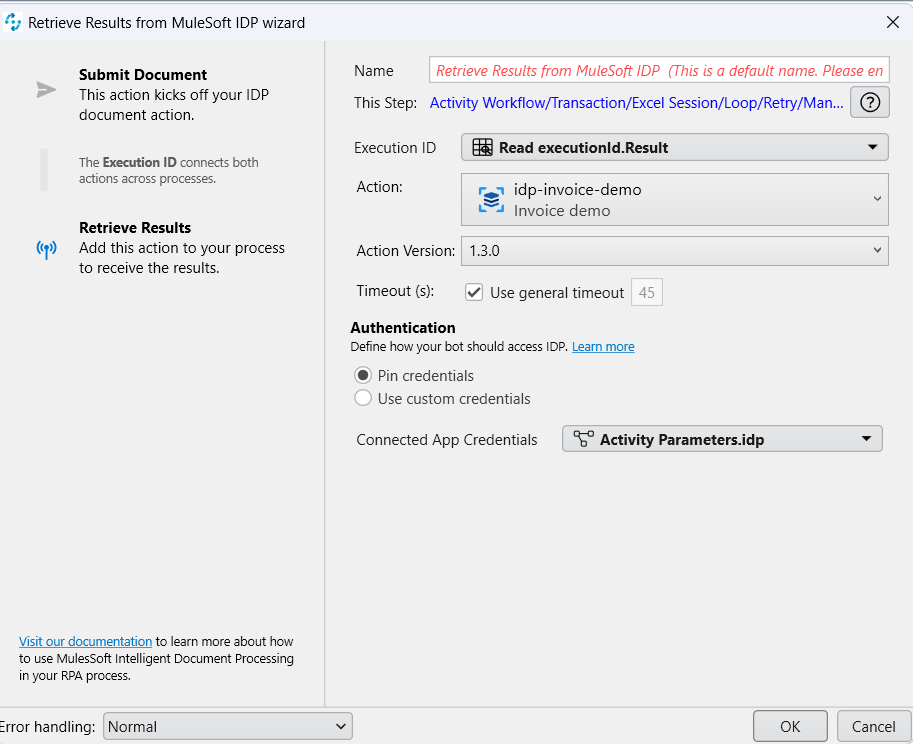
- Retrieve results from MuleSoft IDP. With this function, we will be consuming the Document Action API again, but this time we will hit the GET method under the executionId resource. Set:
- Execution ID: Read executionId.Result
- Action: ‘idp-invoice-demo’
- Connected App Credentials: Activity Parameters.idp
- Select Case. This is a conditional logic block that acts like an If/Else or Switch/Case in programming.
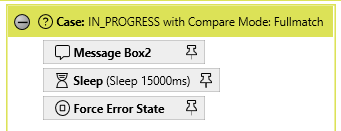
- Case IN_PROGRESS. In case we get the IN_PROGRESS status we need to sleep for 15 seconds and force an error state. This will send the flow to the OnError block.
- DoElse. In case we get a status other than IN_PROGRESS, we will write the status in column E of the spreadsheet and then all the fields extracted by IDP using Managed blocks.

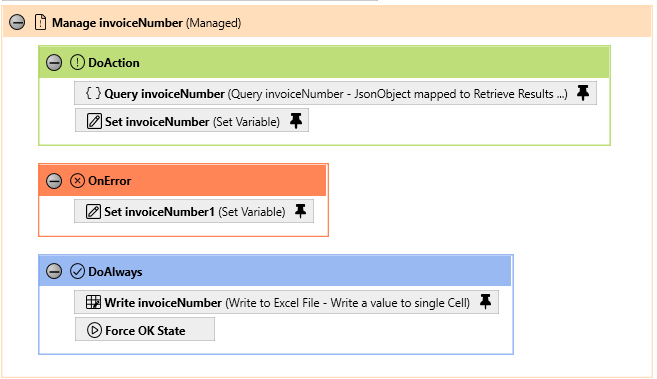
- Manage invoiceNumber. Here we will try to get the jsonpath result for the invoiceNumber using this expression:
$.pages[*].fields.invoiceNumber.value- If successful, we will assign the value from the jsonpath to Activity Parameters.invoiceNumber.
- If we get an error, we will assign a default value to Activity Parameters.invoiceNumber. It can be zero, for example.
- Always write in column F of the spreadsheet the value in Activity Parameters.invoiceNumber and force OK state.
- Manage dueDate. Try to get the jsonpath result for the due date using this expression:
$.pages[*].fields. dueDate.value- If successful, we will assign the value from the jsonpath to Activity Parameters.dueDate.
- If we get an error, we will assign the prompt field to Activity Parameters.dueDate using this expression:
$.pages[*].prompts.p_dueDate.answer.value
- Always write in column G of the spreadsheet the value in Activity Parameters. dueDate and force OK state.

- Manage name. Try to get the jsonpath result for the customer’s name using this expression:
$.pages[*].fields.parties.buyer.name.value- If successful we will assign the value from the jsonpath to Activity Parameters.customerName.
- If we get an error, we will assign a default value to Activity Parameters. customerName. It can be zero, for example.
- We will always write in column H of the spreadsheet the value in Activity Parameters. customerName.
- Manage total. Here we will try to get the jsonpath result for the total using this expression:
$.pages[*].fields. total.value- If successful, we will assign the value from the jsonpath to Activity Parameters.total
- If we get an error, we will assign a default value to Activity Parameters.total. It can be zero, for example.
- We will always write in column F of the spreadsheet the value in Activity Parameters.total and force OK state
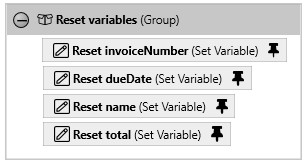
- Reset variables. This group has Set Variable functions for each Activity Parameter to reset the values to <none>, so the values are not carried to the next iteration.
- Break Loop. If the process reaches this stage, it means that no error was found, so we need to break out of the Retry Loop.
- OnError. If the process enters this block, it means that either the Retrieve results from MuleSoft IDP got an error or, most likely, it got the IN_PROGRESS status, which would have made the process sleep for 15 seconds before forcing the error. In both cases, we want to force an OK state and let the flow continue to the next iteration in the Retry loop.
- Running the process
At this point, you should be able to run the end-to-end process locally as long as you have the RPA Bot installed in your environment. At the end of the process, your spreadsheet should look something like this:

Once you are happy with the results, you can upload the process to the RPA manager and advance to the test and production phases.
Review tasks
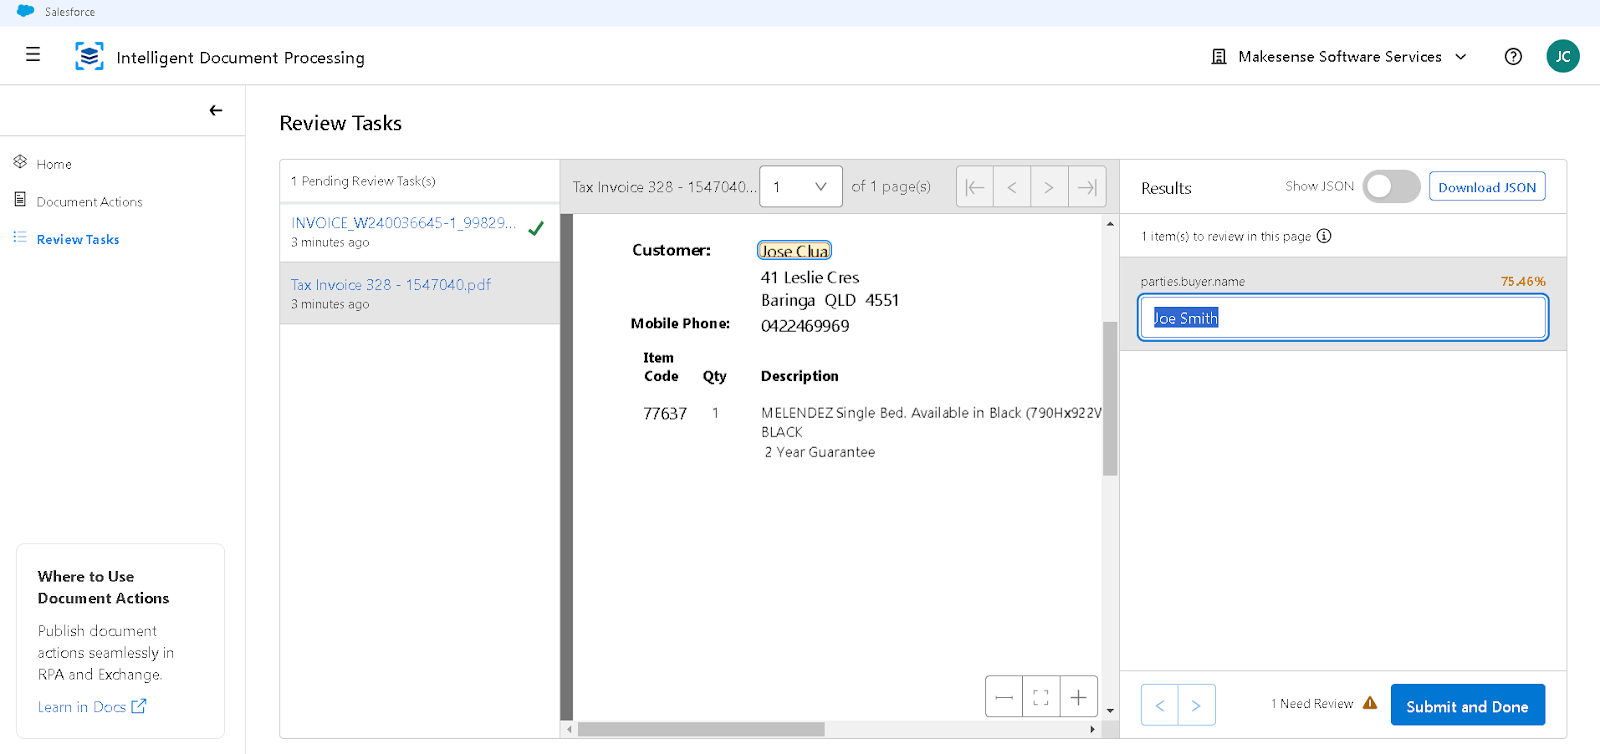
In the previous section, notice that we got some records with the status MANUAL_VALIDATION_REQUIRED. These documents will appear for the Document Action reviewer on the MuleSoft IDP Review Tasks page. The reviewer will be able to, for each document, see which fields got below the confidence threshold and need review. There is also an option to show or download the results in JSON format.
Once the reviewer submits the document, it will go out on the list, and IDP will save the new status as SUCEEDED and hold the updates done by the reviewer against the execution ID.
Reprocess automation
We need to create a flow to reprocess the documents reviewed in IDP. If we expose the automation as an invokable process, the reviewer can trigger this on demand after they finish reviewing all the documents in the list.
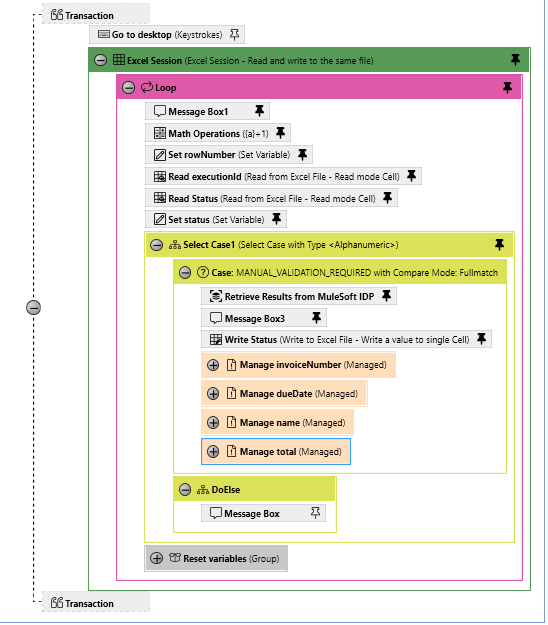
In the previous automated process, it was critical to save the status so we knew which documents needed to be reprocessed and see the execution IDs so we could access the updates.
In our demo, we saved the status and the execution IDs in the Excel spreadsheet so we could create a process that iterates over them. For each record where the status column is MANUAL_VALIDATION_REQUIRED, we read the execution ID and ran the Retrieve results from MuleSoft IDP method again. This time, it should get the SUCCEEDED status and the updates done by the reviewer.
After running this Reprocess flow, only the rows with the status MANUAL_VALIDATION_REQUIRED should be updated with the new status and the updates.

Conclusion
Document workflows can be highly dependent on manual tasks; copying and pasting text from hundreds of PDF documents and feeding different systems is not a fun job, it’s extremely time-consuming and error-prone. In this day and age, with AI becoming more and more part of our lives, it feels wrong to be doing these manual processes, and we can’t avoid asking ourselves if there is a better way of doing things. And there is. By combining AI and automation, we can streamline these processes and turn them from bottlenecks to highly efficient workflows.
With MuleSoft IDP, we get the power of AI to read and extract data from files and easily expose it through REST APIs which can be consumed by other APIs or Salesforce tools such as Flow, Composer and Einstein. If it’s still not possible to execute these workflows without a human in the loop, we can use MuleSoft RPA to simulate user interactions and have a fully automated process without losing sight of reliability and consistency by ensuring minimum confidence levels and having a human easily review and resubmit data whenever minimum quality thresholds are not reached.